Monday, December 29, 2008

The best lights display!!


We finally went to see the lights at our local zoo. They start right after Thanksgiving and run until January 3rd. There are over 1 million lights and, I must say, I would definitely not want to be one of the ones to take them all down. :)

They had a train display and around the lake they had an animated musical lights display. The kids LOVED it. The animated musical lights display was a huge hit!!

Sunday, December 28, 2008

New Aprons for the Kids


I meant to make these and put them in their stockings. Had I known how little time they took, I would have done it one evening after they went to bed. From pulling out my sewing machine to cleaning up my scraps, it took about 30 minutes to do both of them. I got the idea from Family Fun. I bought 2 dish towels at Target and threw these together. The kids really needed them as they both tend to wipe off their hands on their shirts starting at the neck and then down to their knees. :)

New Years Eve craft--My noise makers make noise makers :)


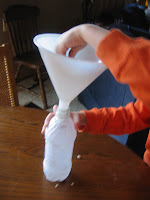
We made noise makers out of empty water bottles. The first thing we did was cover the bottle with glue and then put white tissue paper squares all over it. Then we covered the tissue paper with a coating of glue and let it dry. We used a funnel to put the beans inside that we used to make our bean bags and glued the cap on the bottle. Then we used colored tissue paper to decorate it more and let that dry with yet another coat of glue on the top of it all. We used ribbon to tie around the top as streamers and tied a few jingle bells to them. :) I have told the kids that they won't be dry until Wednesday, just in time for their New Year's party. hee hee

Supplies needed:

empty water bottle
tissue paper
glue
beans or rice
funnel
ribbons
jingle bells

Chocolate kiss pretzels


All of the Christmas candy was on sale at the grocery store for half off so I picked up a bag of the silver, red, and green Hershey kisses. We put one kiss on one pretzel. We used the traditional small pretzels because we had them already, but the woven square ones would work well too. You can put them in the oven on low at 170 degrees for 4-6 minutes or put them in the microwave for a minute. Then we pushed the tops of the kisses down to flatten them, put sprinkles on them them and then popped in the fridge to cool and harden. These are also very good with chocolate and caramel rolos.....yummy.

Wednesday, December 24, 2008

Christmas cookies for Santa!!


I needed a new sugar cookie recipe because I was unhappy with the one I usually used, so my friend Jenn offered hers up and boy are they delicious!!

Jenn's Cookie recipe

1 1/2 cups all purpose flour
1 t baking powder
1/4 t salt
1/2 cup (1 stick) unsalted butter, softened
3/4 cup granulated sugar
1 large egg
1 1/2 t vanilla extract

1.) in medium bowl, combine flour, baking powder, and salt, set aside. In large bowl with electric mixer at high speed beat butter and sugar until light and fluffy. Add egg and vanilla and beat well. At low speed, gradually beat in reserved flour mixture just until incorporated. Divide dough in half; shape each half into a disk. Wrap disks tightly in wax paper. Refrigerate about 1 hour, or until firm enough to roll out.

2. Preheat oven to 350 degrees lightly grease baking sheets

3. Bake 10 to 12 minutes


Basic Icing:
4 cups confectioner’s sugar
1/4 cup (1/2 stick) unsalted butter, melted
1/4 cup heavy cream or milk
2 teaspoons vanilla extract

Santa will surely be happy to stop at this house to have a nice snack and a glass of milk. I hope he likes sprinkles... ;)

Craft Stick Christmas tree


Christmas tree season will soon be over, so we had to hurry and get this craft in before the big guy in red came. I was inspired by this Christmas tree craft from this site. First we glued some craft sicks to make the tree. I cut the craft sticks with a pair of scissors to make them shorter. Then we colored the tree with markers and glued sequins on them and a yellow pom pom for the star. How festive!


Supplies needed:
craft sticks
markers
glue
scissors
yellow pom pom
sequins

Tuesday, December 23, 2008

Happy Birthday to me!


Look at how crafty my husband is. This is the cake he made for my birthday today. Yes, that is LuckyMe! on the computer screen. :) Ahhh, the joys of a fondant computer.

Monday, December 22, 2008

Home made wrapping paper


Both of my kids are getting each other presents for Christmas and they wanted to make their own wrapping paper this year. We drew a squiggley line across a 4 foot piece of easel paper and we used sponges cut out as Christmas lights and giant ink pads to decorate the paper. It looks so cute!!

Supplies needed:
sponges
sharp scissors
easel paper
ink pads

Friday, December 19, 2008

Reindeer food


Adding to the magic of Christmas, we made reindeer food with oatmeal and glitter. We used Christmas stamps and decorated a white bag and mixed the oatmeal and glitter inside. We will throw it on the front lawn on Christmas eve. Here is a cute little poem for it too...

The Reindeer Food we made today will help Rudolph and the others find their way!

Just sprinkle it on the lawn and throw some in the air,

And Santa's sleigh will soon be there!

The oats are a snack for the reindeer to eat,

And the glitter will guide them right to your street!
Supplies needed:
Oatmeal
glitter
bag

Thursday, December 18, 2008

Fun with Foam Stickers!!


We have been reading a different Christmas or winter themed book every night before bed for the month of December. All of these books have snow involved in some way. The kids have been talking about snow all the time and they can't wait until it finally happens. Today, we played with a couple of foam sticker sets. And they made snowman door hangers for their bedrooms and a winter scene on foam sheets. They had a ball with these. I can tell this because of the huge mess it made HAHA...

It was pretty funny to watch though because my 5 year old was telling a winter story as he was putting his winter scene together..."This penguin lives in the igloo and he must be in the Antarctic because that is where penguins live."

Hopefully this has satisfied their desire for snow at least for a little while...
Supplies needed:
Foam sheets
foam stickers

Wednesday, December 17, 2008

Painted glass ornaments 2


I finally convinced my children that you didn't always need to use brushes when we have paint. I had my kids pick 2 colors of paint and then we put a puddle of each color inside the glass ornament and they had to tilt the ornament all over in order to have the paint cover the entire inside. My son decided that his looked like the earth. :) They all look really cool.
supplies needed:
paint (I used tempera)
clear glass ornaments (I got mine from Michael's)

Tuesday, December 16, 2008

Hand print Santa


We did hand prints again today which is pretty funny, because my 5 year old is VERY ticklish on his hands. I used the paint brush to paint their hands white for Santa's beard. We used acrylic paint because it was the only white paint we had. Then we waited a few minutes for them to dry and added a red felt nose, we used a hole punch for cheeks and a mouthm (they love the hole punch), googley eyes, red felt hat and white pom poms to decorate the hat. Very cute!!


supplies needed:
green, red, pink and black construction paper
red felt
white pom poms
googley eyes
white paint ( I used acrylic)
hole puncher

Stained Glass Ornaments


So I watched a show on the Food Network Sunday night, Down Home with the Neeley's, I think, but I can't find the recipe link on their website. They put Jolly Ranchers in metal cookie cutters and they melted them in the oven at 350 degrees for 6 minutes. They made it look so easy. I sprayed the cookie cutters with cooking spray and then I poked a hole in it with the end of a paint brush while it was still warm and melted. I had such a hard time getting those suckers out...they do look super cute though.

Supplies needed:

metal cookie cutters

jolly ranchers

cooking spray

Monday, December 15, 2008

Glittery salt dough ornaments


We made some salt dough combining
1 c. salt
2 c. flour
1 cup water
1 T. lemon juice
also needed: cookie cutters, glitter and Elmer's glue

We split the batch into 2 and then used some food coloring to knead some color into it. Then we floured our work surface and cut out some trees and stars using cookie cutters. We used a straw to punch holes in the ornaments and then I put it in the oven for about 2 hours at 250 degrees until they were hard. After they cooled down the kids brushed on some glue and put the ornament in a bowl and sprinkled them with glitter to limit the sparkles on my floor (hee hee).
After the glue was dry we put ribbon in it to hand them from the tree.

I can't express into words the excitement a little bit of glitter brought to the kids today. They kept asking for something else to glitter. Fortunately, the cat escaped unscathed.

Saturday, December 13, 2008

Easiest Fudge Ever!!


I love fudge, but I never made it because I had to watch a thermometer and I am just not up for that fuss. :)

Here is the easiest Rocky Road Fudge recipe ever!! I make it every year.

2 cups of semisweet chocolate chips

1-14 oz can of sweetened condensed milk

1 teaspoon vanilla extract

3 cups of mini marshmallows

1 1/2 cups of chopped walnuts

I put the chips and the milk in a bowl and then in the microwave for about a minute and then stir them up. If they aren't melted, I put them back in the microwave for another 30 seconds and stir again. Keep doing this until all is melted and smooth. Then stir in the vanilla, walnuts and marshmallows. I then pour them in an 8x8 inch pan covered with foil. Then put it in the refrigerator for a couple of hours and then pull it out by the foil and peel it off. Then cut it up. Wow! It takes about 3 minutes to make (not counting the time in the refrigerator).

Friday, December 12, 2008

A Gingerbread Street!


I was bound and determined to make a gingerbread house this year, but it looks like it got a little out of control. I have never made one before from scratch and really wanted to make one (darn you gingerbread house competition on the Food Network!!). I must admit that I was more than a little intimidated, but I can't believe how easy and HOW MUCH FUN it was to put together. I used the directions here and it couldn't have been easier. In the recipe there is enough dough to make at least 2 houses and 8 gingerbread men. While I was putting the houses together, the kids used ice cream cones, royal icing and Mike and Ikes to make trees for our little neighborhood. Then we all decorated the houses. SO MUCH FUN!!! I highly recommend it!

Thursday, December 11, 2008

We're going on an animal hunt!


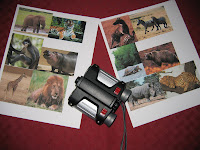
Today, we put away the glue and scissors and decided to go on an animal scavenger hunt. I went to Google images and found 12 animal pictures and put them in a Word document and printed 3 copies of them on card stock. I gave each of my kids a copy of the pictures and cut out the 3rd copy and taped them up in 2 rooms in their own little hidding spots. My son was very excited about this activity and felt he needed to bring his binoculars with him on this hunt.

The kids then went around the house and when they found the pictures, they took the animals and taped it on their animal list. It was actually very sweet to watch as my 5 year old son helped my 2 year old daughter find the animals and put some on her list. We played this MANY times. They even hid them all from me and I had to find them. Fun was had by all.

Wednesday, December 10, 2008

Oh Pasta Tree?


In an effort to do a craft that had nothing to do with the holidays, I brought out the paper, glue and colored pasta so they could make what ever kind of picture they wanted. They were shocked and asked that I make them a Christmas tree to decorate with the pasta. It was pretty funny. Thank goodness Elmer's dries clear. :)

You can use this pasta for lots of things. I colored BOXES and BOXES of pasta a few months ago and we have used it for several things already like making pasta necklaces, bracelets, art etc. To make the colored pasta I tossed about 2 cups of pasta in a ziploc bag and added 4-5 drops of food coloring and 1 Tablespoon of rubbing alcohol and shook it all up until it was the color I wanted it. Then I spread them all out on paper towels on cookie sheets to air dry. I did a ton at once, so that I would have it on hand when we needed it.
Supplies needed:
rubbing alcohol
pasta
food coloting
baggies
construction paper
glue

Kid's Art Display


My kids have a playroom in our finished basement that is ALL theirs. Just about 95% of all of their toys are down there. It is a great place to display their artwork and projects. I stole this idea from a couple of catalogues I receive that were charging an arm and a leg for the same thing. At Michael's (have I mentioned how much I love that store?) they have these cut out wood shapes in just about anything you can think of... cars, sports, animals, etc. You can even buy them already painted for pretty cheap. I bought a bunch of them and glued them to clothes pins and hung them on a clothes line attached to our wall (obviously, I need to go buy more since I have some naked clothes pins up there). I use these clothes pins to hang some of the work my kids do. They LOVE having a place to put their works of art. Just wanted to share what we did with it all since some of you have been asking. :)

Tuesday, December 9, 2008

Candy cane and wreath ornaments


We have a slew of pom poms in various sizes, so today we made candy cane and wreath ornaments for the tree. In order to help out my 2 year old, I put the glue on the template first so she could just put the pom poms on herself. Please ignore the excess glue that has not yet dried from my overzealous gluer :)


Supplies needed:
Card stock-- green and white
pom poms
glue
ribbon